3inONEder for Toshiba portables: Difference between revisions
| (50 intermediate revisions by the same user not shown) | |||
| Line 1: | Line 1: | ||
[[File: | [[File:3inONEder main.jpg|alt=|right|451x451px]] | ||
[[File:20230830 172505.jpg|right|frameless|451x451px]]<small>Note to other Toshiba collectors. '''Wanted dead or alive''': complete T5200c or a dead T3200sxc motherboard for components. Will buy, trade etc. If you are looking for parts you can also let me know. I have donor machines for the T1200, T3100, T3100e, T3100sx ,T3200, T5200. Just want some more info or talk about other 80's portables, send me a message at conventionalmemories@gmail.com</small> | |||
== Intro == | == Intro == | ||
This project started as a continuation of my previous [[CF adapter for Toshiba portables]] project. In using those I started to realize that there where more features that I wanted on my Toshiba's, like sound and analog joystick controls. Unfortunately most of the Toshiba models only have one expansion port (except T3200 & T5200 line). So it quickly became clear I had to integrate some more features on the same boards. | This project started as a continuation of my previous [[CF adapter for Toshiba portables]] project. In using those I started to realize that there where more features that I wanted on my Toshiba's, like sound and analog joystick controls. Unfortunately most of the Toshiba models only have one expansion port (except T3200 & T5200 line). So it quickly became clear I had to integrate some more features on the same boards. | ||
== Features == | == Features == | ||
| Line 9: | Line 10: | ||
** Bootable or as second drive. | ** Bootable or as second drive. | ||
** Reconfigurable XTide BIOS from DOS. | ** Reconfigurable XTide BIOS from DOS. | ||
** Ability to control Internal IDE controllers as well. | ** Ability to control Internal IDE controllers as well (to remove the BIOS HDD limits). | ||
* PC Joystick port. | * PC Joystick port. | ||
** Connect one or two joysticks for a total of 4 analog inputs and 4 buttons. | ** Connect one or two joysticks for a total of 4 analog inputs and 4 buttons. | ||
| Line 15: | Line 16: | ||
* Adlib compatible soundcard | * Adlib compatible soundcard | ||
** Yamaha OPL3 sound chip (YAC512-M+YMF262-M). | ** Yamaha OPL3 sound chip (YAC512-M+YMF262-M). | ||
** Line level output, powerful enough to drive small earphones. Or usable with amplified speakers. | |||
** IO address selectable. | ** IO address selectable. | ||
* NEW, ethernet controller. | |||
** Partially NE2000 compatible. | |||
** DOS and ELKS linux packet drivers. | |||
== Where to buy? == | == Where to buy? == | ||
[//www.ebay.com/usr/conventionalmemories //www.ebay.com/usr/conventionalmemories] | |||
Want to order outside of eBay? (and get a small discount) Email me at ConventionalMemories@gmail.com | |||
'''Update Sep 2024''': | |||
New batch available now, accepting orders only through email / PayPal. (a small number of cards will be listed on ebay later) | |||
To order please send me an e-mail at ConventionalMemories@gmail.com with your order and full adress. | |||
3 Versions available. | |||
Version A, €50 : CF card only. | |||
Version B, €85 : CF, OPL3 sound and Joystick | |||
Version C, €110 : CF, OPL3 sound and Joystick + Ethernet | |||
[[File:20230830 172505.jpg|none|thumb|452x452px|Left: version A, center: B, right: C]] | |||
Shipping estimates (with tracking): | |||
Europe: €16 | |||
Worldwide: €22 | |||
== Compatible Toshiba models == | == Compatible Toshiba models == | ||
[[File:3inONEder T3100sx installing.jpg|right|231x231px]] | |||
[[File:Expansion_slot_location.png|alt=|frameless]] | [[File:Expansion_slot_location.png|alt=|frameless]] | ||
This card is compatible with every Toshiba model that has the Toshiba expansion slot, or as it is named in the official Toshiba documentation "Toshiba proprietary expansion slot - "A" form factor". | |||
*T1100 PLUS (not T1100) | This card is compatible and has been tested with every Toshiba T-series model that has the Toshiba expansion slot, or as it is named in the official Toshiba documentation "Toshiba proprietary expansion slot - "A" form factor". The expansion slot is located on the back of the machine. (except for the T1600 which has it on the left side) | ||
*T1100 PLUS (not the original T1100) | |||
*T1200 | *T1200 | ||
*T1600 | *T1600 and T1600/40 | ||
*T2100 from 1986 (not the later "satellite T2100") | *T2100 from 1986 (not the later "satellite T2100") | ||
*T3100 | *T3100 and T3100/20 | ||
*T3200sx | *T3100e and T3100e/40 | ||
*T5100 | *T3100sx and T3100sx/80 | ||
*T5200 | *T3200sx and T3200sx/120 (not the original T3200) | ||
*T3200sxc and T3200sxc/120 | |||
*T5100 and T5100/100 | |||
*T5200, T5200/100 and T5200/200 | |||
*T5200c | |||
Some of the Japanese models J-3100… have the same expansion slot and should work as well, not sure. I have not been able to test this yet however. | Some of the Japanese models J-3100… have the same expansion slot and should work as well, not sure. I have not been able to test this yet however. | ||
Small update: | |||
Apparently GRiD released a relabelled T3100 as the GRiD-286, I can confirm that the hardware is 100% the same as the T3100 and only the case has been relabelled. So the GRiD-286 is also fully compatible. | |||
I have been able to test some of the J3100 series and have found no issues with the Japanese DOS versions and software, so I assume all J3100 models that have the expansion slot will work. For reference, I have been able to test the following models: | |||
* J-3100 (Japanese version of the T3100) | |||
* J-3100GT (Japanese version of the T3100E) | |||
* J-3100GT XDV (66Mhz 486, this is probably the fastest compatible laptop) | |||
== 3D printed bracket == | |||
Want to print your own bracket in a different material or colour? STL files are available [//ftp.conventionalmemories.com/project%20files/3inONEder/3D%20printed%20backplate/ here.] | |||
== In depth == | == In depth == | ||
Because this is effectively 3 ISA cards on one board I'll split this part up in 3 different sections. | Because this is effectively 3 ISA cards on one board I'll split this part up in 3 different sections. | ||
=== CF adapter === | === CF adapter === | ||
Based on [ | Based on [//www.lo-tech.co.uk/wiki/Lo-tech_XT-CF_Boards Lo-tech's XT-CF cards] | ||
==== Programming the XTide bios. ==== | |||
'''Important''': To ensure compatibility with Toshiba models with an 8086 processor all cards will be configured by default (unless specifically asked otherwise at time of purchase) with an XT version of the XTIDE BIOS, to get better performance on machines with a 286 or higher processor it is recommended to upgrade to an AT version of the XTIDE BIOS. | |||
All the files discussed in this document can be downloaded [http://ftp.conventionalmemories.com/project%20files/3inONEder/XTideCFG/ here]. | |||
(extract these files somewhere you can access from the computer for which you want to program the ROM with. Floppy, Hard Disk or CF card) | |||
'''Update for cards with ethernet:''' Cards with the new optional ethernet use I/O port 0x300 for the network card and have the XTide moved to port 320, they thus require a new configuration files, use the files with 320 in the name for these instead. Example: XT320.BIN instead of XT.BIN | |||
''<big>Configuration files</big>'' | |||
* FLASH.EXE “Lo-tech XT-CF flash utility” For flashing config to ROM | |||
* XTIDECFG.COM XT-IDE configuration editor | |||
* XT.BIN Pre-configured for XT class machines (8088 & 8086) | |||
* AT.BIN Pre-configured for 286 and higher machines | |||
* AT-INT.BIN Same as “AT”, with support for internal IDE controller | |||
<big>''Which pre-configured BIOS to use for which Toshiba portable?''</big> | |||
* Use “XT.BIN” for XT class machines. | |||
** T1100 PLUS | |||
** T1200 | |||
** T2100 | |||
* Use “AT.BIN” for 286 and higher machines. | |||
** T1600 | |||
** T3100(e)(sx) | |||
** T3200sx(c) | |||
** T5100 | |||
** T5200(c) | |||
* The “AT-INT.BIN” file is only for portables that also already have an IDE controller on board, only use this if you want to change out the internal HDD for another IDE drive or adapter. The original Toshiba BIOS has a lot of restrictions when it comes to HDD’s, it often only supports a few specific Conner disks. With this configuration the BIOS on our board will also control the internal IDE controller therefore bypassing the restrictions of the original Toshiba BIOS. | |||
** T1600 (not /40 model, it doesn't have an IDE controller) | |||
** T3100e | |||
** T3200sx(c) | |||
** T5100 | |||
** T5200(c) | |||
<big>''Flashing a configuration to ROM.''</big> | |||
# Make sure the config (.BIN) file is in the same directory as the Flash utility. | |||
# Run the following command: <code>FLASH “CFG.BIN” “base-address”</code> | |||
#* With “CFG.BIN” being the configuration you want to flash. | |||
#* With “base-address” being the base address for the ROM, “C800” on my board. | |||
#* EXAMPLE: <code>FLASH XT.BIN C800</code> | |||
# After Flashing is done, reboot. | |||
<big>''Editing a Configuration.''</big> | |||
This is only for if you want to change something about the pre-configured files I've made, for example: change the default boot order. | |||
# Run “XTIDECFG.COM” to open the configuration editor. | |||
# Open the configuration you want to edit with the “Load BIOS from file” option. | |||
# Change the configuration as you like. | |||
# use "Save BIOS back to original file" | |||
# Exit the configuration editor. | |||
# Now you can flash the configuration. | |||
'''IMPORTANT''': after editing a configuration always use the “Save BIOS back to original file” option, do not try to flash from within the Configuration program. Use the stand alone Flash utility as described above. | |||
=== Soundcard === | === Soundcard === | ||
| Line 46: | Line 143: | ||
I made some small changes to allow for IO address selection, based on "spark2k06" [https://github.com/spark2k06/Internal_ISAOPL3 Internal OPL3] board. | I made some small changes to allow for IO address selection, based on "spark2k06" [https://github.com/spark2k06/Internal_ISAOPL3 Internal OPL3] board. | ||
===== Dip-switches ===== | |||
The port address can be configured with dip switches 3 and 4 of bank 2. | |||
{| class="wikitable" | |||
|+ | |||
!SW3 | |||
!SW4 | |||
!port | |||
! | |||
|- | |||
|off | |||
|off | |||
|388h | |||
|Adlib gold FM | |||
|- | |||
|off | |||
|on | |||
|388h and 220h | |||
|Adlib gold FM + SB pro (default) | |||
|- | |||
|on | |||
|off | |||
|220h | |||
| | |||
|- | |||
|on | |||
|on | |||
|240h | |||
| | |||
|} | |||
===== Schematic ===== | ===== Schematic ===== | ||
| Line 56: | Line 183: | ||
[[File:3inONEder_toshiba_joystick_schematic.png|alt=|frameless]] | [[File:3inONEder_toshiba_joystick_schematic.png|alt=|frameless]] | ||
=== Ethernet controller === | |||
===== Intro ===== | |||
To have full compatibility with all Toshiba models, Including the ones with an 8086 processor (like T1100+, T1200 and T2100) the ISA bus of the card has been limited to 8-bit, Therefore the NE2000 compatible ethernet chipset isn't fully compatible with the 16-bit NE2000. | |||
However, thanks to the vintage computer community there's now a patched NE2000 packet driver available for 8-bit DOS systems. https://forum.vcfed.org/index.php?threads/ne2000-packet-drivers-for-8-bit-slots.41507/ | |||
A DOS packet driver like this will probably be enough for many people, especially combined with the [https://www.brutman.com/mTCP/ Brutman mTCP stack]. | |||
More info and a quick start guide coming soon. | |||
'''Update:''' As of v0.6.0 the [//github.com/jbruchon/elks ELKS Linux OS] now also has an 8-bit compatible NE2000 driver. (I haven't tested this yet) | |||
===== Getting started. ===== | |||
====== Card setup ====== | |||
The following setup procedure should only be done once and will be saved after reboot. If you move the card to a different Toshiba model or if you add another expansion card I would recommend going trough the setup again to avoid any IRQ or I/O port conflicts. | |||
By default the ethernet controller is set up on I/O port 0x300 and IRQ 5 this should be ok for most Toshiba models. (I haven't tested it yet but it I think the T1200 might have IRQ 5 already in use). That being said, It's best to check by running "[//ftp.conventionalmemories.com/project%20files/3inONEder/ethernet/RSET8019.EXE RSET8019.EXE]". This program will check both I/O ports and IRQ addresses and give you a popup when there's a conflict and suggests changes. Whilst you have the program open It's also a good idea to check the current configuration by selecting "View Current Configuration" from the main menu and make sure the following options are set correctly: | |||
{| class="wikitable" | |||
|+ | |||
|Operating Mode: | |||
|Jumperless | |||
|- | |||
|Medium Type: | |||
|Auto Detect | |||
|- | |||
|Full-duplex | |||
|Enabled | |||
|- | |||
|I/O Base | |||
|300 | |||
|- | |||
|Interrupt | |||
|5 (unless there's a conflict) | |||
|- | |||
|Boot Rom | |||
|No Boot ROM | |||
|} | |||
If any of these values are not set correctly you'll have to change them by selecting "Setup" from the main menu. | |||
Now you can exit the RSET8019 program saving any changes. These setting should remain after rebooting, but I find it best to reboot and check them again. | |||
After that's done you're network card is set up. You can now run the packet driver and get your pc connected. | |||
====== Packet driver ====== | |||
Thanks to Dan aka [//forum.vcfed.org/index.php?threads/ne2000-packet-drivers-for-8-bit-slots.41507/ "profdc9" over on the VCFed] forums there's an 8-bit modified version of the NE2000 driver available. | |||
To use [//ftp.conventionalmemories.com/project%20files/3inONEder/ethernet/driver/NE2000.COM "NE2000.COM"]: | |||
Use command: <code>NE2000 0x60 5 0x300</code> | |||
Where 0x60 is the software interrupt, 5 is the IRQ we checked with RSET8019 and 0x300 is the base address, also configured in RSET8019. | |||
Of course this command can also be loaded in your "autoexec.bat", this way you don't have to start it every time you want to connect. | |||
After all of that you're now ready to go, I would suggest checking out the [//www.brutman.com/mTCP/ mTCP applications by Brutman] to get you started, | |||
===== Schematic ===== | |||
[[File:3inONEder ethernet schematic V1.jpg|left|frameless]] | |||
__FORCETOC__ | __FORCETOC__ | ||
Latest revision as of 16:19, 5 October 2024
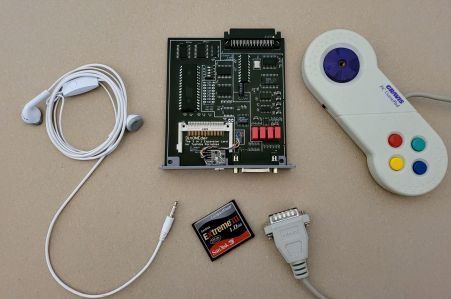
Note to other Toshiba collectors. Wanted dead or alive: complete T5200c or a dead T3200sxc motherboard for components. Will buy, trade etc. If you are looking for parts you can also let me know. I have donor machines for the T1200, T3100, T3100e, T3100sx ,T3200, T5200. Just want some more info or talk about other 80's portables, send me a message at conventionalmemories@gmail.com
Intro
This project started as a continuation of my previous CF adapter for Toshiba portables project. In using those I started to realize that there where more features that I wanted on my Toshiba's, like sound and analog joystick controls. Unfortunately most of the Toshiba models only have one expansion port (except T3200 & T5200 line). So it quickly became clear I had to integrate some more features on the same boards.
Features
- Compact Flash adapter, bootable using the XTide BIOS
- Bootable or as second drive.
- Reconfigurable XTide BIOS from DOS.
- Ability to control Internal IDE controllers as well (to remove the BIOS HDD limits).
- PC Joystick port.
- Connect one or two joysticks for a total of 4 analog inputs and 4 buttons.
- Compatible with 4 button joysticks/gamepads like the Gravis Gamepad
- Adlib compatible soundcard
- Yamaha OPL3 sound chip (YAC512-M+YMF262-M).
- Line level output, powerful enough to drive small earphones. Or usable with amplified speakers.
- IO address selectable.
- NEW, ethernet controller.
- Partially NE2000 compatible.
- DOS and ELKS linux packet drivers.
Where to buy?
//www.ebay.com/usr/conventionalmemories
Want to order outside of eBay? (and get a small discount) Email me at ConventionalMemories@gmail.com
Update Sep 2024:
New batch available now, accepting orders only through email / PayPal. (a small number of cards will be listed on ebay later)
To order please send me an e-mail at ConventionalMemories@gmail.com with your order and full adress.
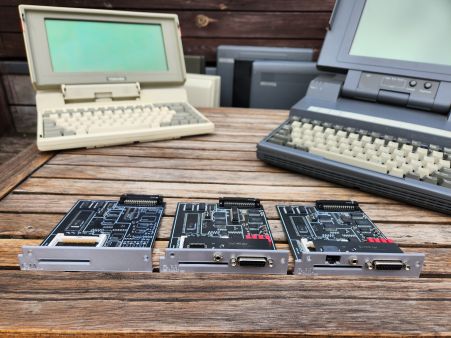
3 Versions available.
Version A, €50 : CF card only.
Version B, €85 : CF, OPL3 sound and Joystick
Version C, €110 : CF, OPL3 sound and Joystick + Ethernet
Shipping estimates (with tracking):
Europe: €16
Worldwide: €22
Compatible Toshiba models
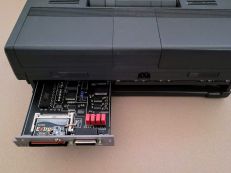
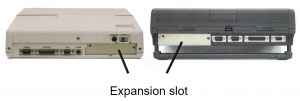
This card is compatible and has been tested with every Toshiba T-series model that has the Toshiba expansion slot, or as it is named in the official Toshiba documentation "Toshiba proprietary expansion slot - "A" form factor". The expansion slot is located on the back of the machine. (except for the T1600 which has it on the left side)
- T1100 PLUS (not the original T1100)
- T1200
- T1600 and T1600/40
- T2100 from 1986 (not the later "satellite T2100")
- T3100 and T3100/20
- T3100e and T3100e/40
- T3100sx and T3100sx/80
- T3200sx and T3200sx/120 (not the original T3200)
- T3200sxc and T3200sxc/120
- T5100 and T5100/100
- T5200, T5200/100 and T5200/200
- T5200c
Some of the Japanese models J-3100… have the same expansion slot and should work as well, not sure. I have not been able to test this yet however.
Small update:
Apparently GRiD released a relabelled T3100 as the GRiD-286, I can confirm that the hardware is 100% the same as the T3100 and only the case has been relabelled. So the GRiD-286 is also fully compatible.
I have been able to test some of the J3100 series and have found no issues with the Japanese DOS versions and software, so I assume all J3100 models that have the expansion slot will work. For reference, I have been able to test the following models:
- J-3100 (Japanese version of the T3100)
- J-3100GT (Japanese version of the T3100E)
- J-3100GT XDV (66Mhz 486, this is probably the fastest compatible laptop)
3D printed bracket
Want to print your own bracket in a different material or colour? STL files are available here.
In depth
Because this is effectively 3 ISA cards on one board I'll split this part up in 3 different sections.
CF adapter
Based on Lo-tech's XT-CF cards
Programming the XTide bios.
Important: To ensure compatibility with Toshiba models with an 8086 processor all cards will be configured by default (unless specifically asked otherwise at time of purchase) with an XT version of the XTIDE BIOS, to get better performance on machines with a 286 or higher processor it is recommended to upgrade to an AT version of the XTIDE BIOS.
All the files discussed in this document can be downloaded here.
(extract these files somewhere you can access from the computer for which you want to program the ROM with. Floppy, Hard Disk or CF card)
Update for cards with ethernet: Cards with the new optional ethernet use I/O port 0x300 for the network card and have the XTide moved to port 320, they thus require a new configuration files, use the files with 320 in the name for these instead. Example: XT320.BIN instead of XT.BIN
Configuration files
- FLASH.EXE “Lo-tech XT-CF flash utility” For flashing config to ROM
- XTIDECFG.COM XT-IDE configuration editor
- XT.BIN Pre-configured for XT class machines (8088 & 8086)
- AT.BIN Pre-configured for 286 and higher machines
- AT-INT.BIN Same as “AT”, with support for internal IDE controller
Which pre-configured BIOS to use for which Toshiba portable?
- Use “XT.BIN” for XT class machines.
- T1100 PLUS
- T1200
- T2100
- Use “AT.BIN” for 286 and higher machines.
- T1600
- T3100(e)(sx)
- T3200sx(c)
- T5100
- T5200(c)
- The “AT-INT.BIN” file is only for portables that also already have an IDE controller on board, only use this if you want to change out the internal HDD for another IDE drive or adapter. The original Toshiba BIOS has a lot of restrictions when it comes to HDD’s, it often only supports a few specific Conner disks. With this configuration the BIOS on our board will also control the internal IDE controller therefore bypassing the restrictions of the original Toshiba BIOS.
- T1600 (not /40 model, it doesn't have an IDE controller)
- T3100e
- T3200sx(c)
- T5100
- T5200(c)
Flashing a configuration to ROM.
- Make sure the config (.BIN) file is in the same directory as the Flash utility.
- Run the following command:
FLASH “CFG.BIN” “base-address”- With “CFG.BIN” being the configuration you want to flash.
- With “base-address” being the base address for the ROM, “C800” on my board.
- EXAMPLE:
FLASH XT.BIN C800
- After Flashing is done, reboot.
Editing a Configuration.
This is only for if you want to change something about the pre-configured files I've made, for example: change the default boot order.
- Run “XTIDECFG.COM” to open the configuration editor.
- Open the configuration you want to edit with the “Load BIOS from file” option.
- Change the configuration as you like.
- use "Save BIOS back to original file"
- Exit the configuration editor.
- Now you can flash the configuration.
IMPORTANT: after editing a configuration always use the “Save BIOS back to original file” option, do not try to flash from within the Configuration program. Use the stand alone Flash utility as described above.
Soundcard
The soundcard portion is a copy of Texelec's excellent Resound 2card.
I made some small changes to allow for IO address selection, based on "spark2k06" Internal OPL3 board.
Dip-switches
The port address can be configured with dip switches 3 and 4 of bank 2.
| SW3 | SW4 | port | |
|---|---|---|---|
| off | off | 388h | Adlib gold FM |
| off | on | 388h and 220h | Adlib gold FM + SB pro (default) |
| on | off | 220h | |
| on | on | 240h |
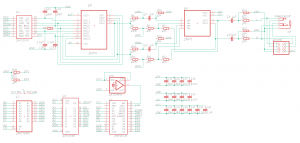
Schematic
Joystick adapter
The joystick portion is schematically the same as IBM's Game Control Adapter. I did only use SMD parts instead of TRH for the board layout to save space.
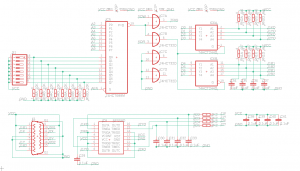
Schematic
Ethernet controller
Intro
To have full compatibility with all Toshiba models, Including the ones with an 8086 processor (like T1100+, T1200 and T2100) the ISA bus of the card has been limited to 8-bit, Therefore the NE2000 compatible ethernet chipset isn't fully compatible with the 16-bit NE2000.
However, thanks to the vintage computer community there's now a patched NE2000 packet driver available for 8-bit DOS systems. https://forum.vcfed.org/index.php?threads/ne2000-packet-drivers-for-8-bit-slots.41507/
A DOS packet driver like this will probably be enough for many people, especially combined with the Brutman mTCP stack.
More info and a quick start guide coming soon.
Update: As of v0.6.0 the ELKS Linux OS now also has an 8-bit compatible NE2000 driver. (I haven't tested this yet)
Getting started.
Card setup
The following setup procedure should only be done once and will be saved after reboot. If you move the card to a different Toshiba model or if you add another expansion card I would recommend going trough the setup again to avoid any IRQ or I/O port conflicts.
By default the ethernet controller is set up on I/O port 0x300 and IRQ 5 this should be ok for most Toshiba models. (I haven't tested it yet but it I think the T1200 might have IRQ 5 already in use). That being said, It's best to check by running "RSET8019.EXE". This program will check both I/O ports and IRQ addresses and give you a popup when there's a conflict and suggests changes. Whilst you have the program open It's also a good idea to check the current configuration by selecting "View Current Configuration" from the main menu and make sure the following options are set correctly:
| Operating Mode: | Jumperless |
| Medium Type: | Auto Detect |
| Full-duplex | Enabled |
| I/O Base | 300 |
| Interrupt | 5 (unless there's a conflict) |
| Boot Rom | No Boot ROM |
If any of these values are not set correctly you'll have to change them by selecting "Setup" from the main menu.
Now you can exit the RSET8019 program saving any changes. These setting should remain after rebooting, but I find it best to reboot and check them again.
After that's done you're network card is set up. You can now run the packet driver and get your pc connected.
Packet driver
Thanks to Dan aka "profdc9" over on the VCFed forums there's an 8-bit modified version of the NE2000 driver available.
To use "NE2000.COM":
Use command: NE2000 0x60 5 0x300
Where 0x60 is the software interrupt, 5 is the IRQ we checked with RSET8019 and 0x300 is the base address, also configured in RSET8019.
Of course this command can also be loaded in your "autoexec.bat", this way you don't have to start it every time you want to connect.
After all of that you're now ready to go, I would suggest checking out the mTCP applications by Brutman to get you started,
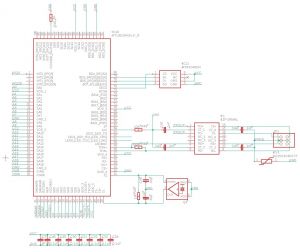
Schematic
